Show Posts

This section allows you to view all posts made by this member. Note that you can only see posts made in areas you currently have access to.


Topics - tesla500

Pages: [1]
1
This is an SSD holder for the Chronos 1.4 and 2.1-HD. This accessory is invaluable when shooting DNG on the go; save speed is vastly improved compared to an SD card. The camera can write about 60MB/s to a SATA SSD instead of ~12MB/s to most SD cards. DNG saves at about 12FPS on the 2.1-HD and about 18FPS on the 1.4, at full resolution.


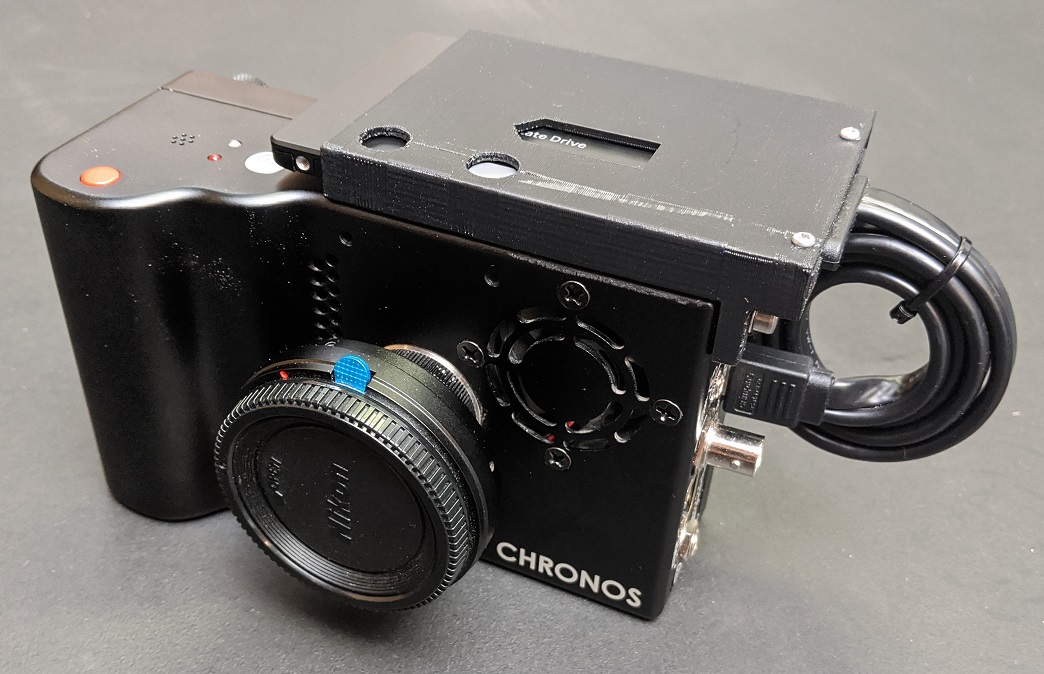
We plan to offer this for sale in our store eventually, but you can 3D print one right now! The attached models have been updated from the pictures shown, the SD card opening was widened so you can easily grab an SD card with your fingers instead of needing pliers to remove it.

We're in the process of ordering custom versions of the eSATAp cables that have a short cable length to avoid the need to coil up the extra cable.


Items you'll need


3D Printer to print the SSD cage (see attached files)
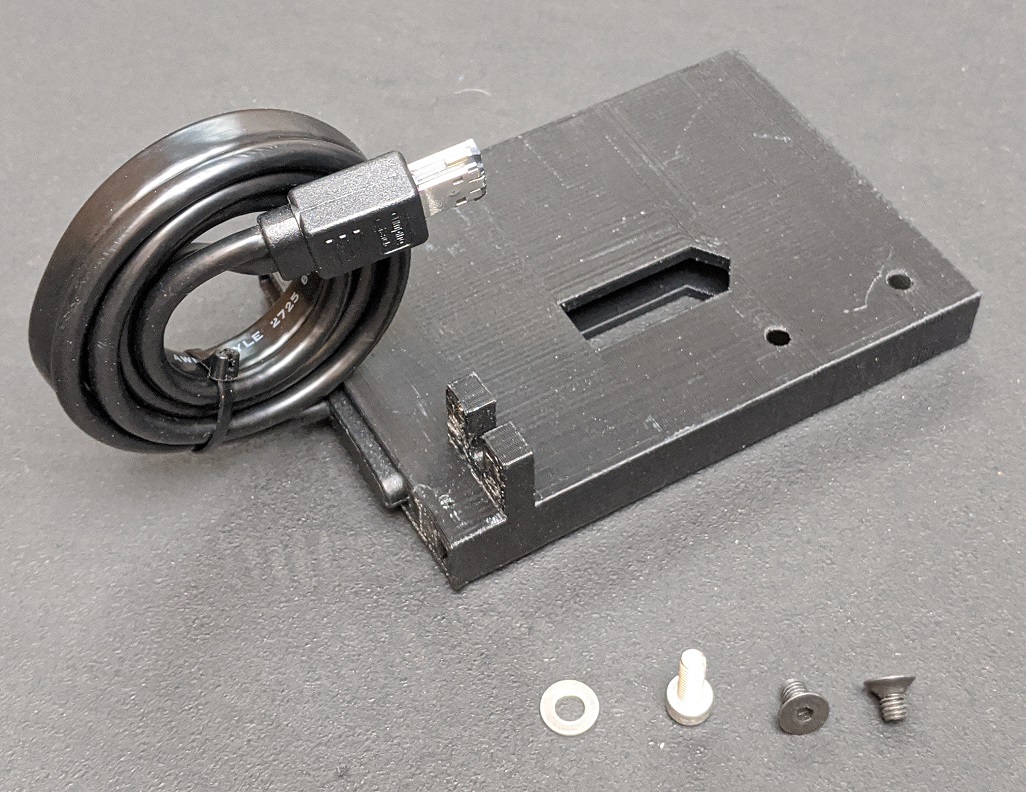
3D Print Instructions
This file has been tested on the Makerbot Replicator 2X
Recommended settings:
Print with raft, raft expansion 12mm
Print with supports
Orient the part with the drive opening pointing straight up

We've been using these at Krontech for the last few months and these mounts are incredibly useful, let us know how they work for you! One modification we were thinking about is centering the SSD above the camera. Currently, it overhangs the screen and makes it harder to see if you're looking from an upward angle. Thoughts?

2
This beta update adds a greatly improved demosaic for in-camera h264 saving. This brings the quality of saved MP4 files near that of externally processed RAW files. We've been using this regularly without issues, but as always with beta software, don't use it for anything mission critical where you can't recreate a shot.

This replaces the old bilinear demosaic with one based on AHD (Adaptive Homogeneity Directed), with some modifications for fewer color artifacts around single-pixel objects, and lower resource utilization.

Installation
This update must be installed over V0.3.0, if you have not installed that, follow the instructions on the software update page. Once you're on V0.3.0, you can download the attached update, the installation instructions are exactly the same as for V0.3.0 update linked above. Once installed, the application revision will remain the same but the FPGA revision will be 3.9

Let us know how it works!

3
Software Dev / Software V0.3.0 full release
« on: July 24, 2018, 12:28:13 PM »
Update: Software V0.3.1 full release is now available: http://forum.krontech.ca/index.php?topic=460

Software V0.3.0 is now available on the software updates page. No real changes from 0.3 RC2, apart from the version string and some minor capitalization changes.

A 0.3.1 release is in progress to fix some bugs left over from 0.2 that were discovered in testing. V0.3.0 is still considered as stable or better than 0.2.

V0.3.0 changes relative to V0.2

Notable Changes:

    White balance can be selected from 5 common presets in addition to taking your own as you could previously.
    Custom White Balance calibration (via Set White Balance) now works as expected, and produces vastly more realistic colours.
    Colour reproduction is greatly improved, especially reds.
    Set White Balance now calculates against 80% brightness white instead of 100% brightness white.
    File size warning when saving are generally more reliable now. (eg., 4+GB file warning now FAT32-only, since only FAT32 has a 4GB file size limit.)
    Changes to video saving settings are now applied as they are made, not just when the popup is closed.
    Keyboard behavior improved; text is now selected when you tap an edit box.
    UI can be flipped upside-down, or set to display the main screen menu on the left side.
    You can configure the "Unsaved video in RAM" popup that appears when you hit the record button with an unsaved video in memory. It can be set to "Always", "If not reviewed" (default), or "Never". The previous behavior was always "If not reviewed".
    The sliders on main screen the play screen have been made larger for ease of grabbing.
    Trigger I/O's Trigger delay input was moved to the Trigger Delay screen. A slider has been added as a visual aid and an alternate way to adjust the trigger delay. The ratio between post-trigger frames and record length in frames is kept constant between resolution and framerate changes.
    Added Trigger Delay screen and Record Modes screen, accessible from Record Settings. Selectable modes are Normal, Segmented, and Gated Burst.
    Black cal duration reduced by 10s to 15s or so at max resolution.
    Use any SD card. Previously, a class 10 SD card was required. You can now use slower cards. Of course, using a slower SD card means that videos save slower too.
    You can now auto-record after saving and/or auto-save after recording. This can loop if both are used at the same time.


Minutiae:

    Playback screen has 'region to be saved' marked. Each region saved is marked in a different color.
    There is now a Settings tab in the Util pages. This can be used to backup, restore, or reset settings, which does not include black calibration.
    Play -> Settings: bitsPerPixel, maxBitrate, saved file framerate, format, filename and save location are now saved as soon as they are changed instead of when the Close button is pressed.
    Mark In and Mark Out have been renamed to Mark Start and Mark End, probably just until the video seek bar is made horizontal.
    The Enter key has been changed to say Apply, since you have to press it to apply your changes on the record settings window.


Known bugs:

    The first few frames in saved videos are from the end of the recording.
    The camera will freeze after saving approximately 45 videos.  Make sure to reboot before saving approximately 40 videos to ensure the camera does not freeze. This bug exists in all previous releases as well.
    The camera will freeze when saving a video that is over 4GB onto a FAT32 partition, or when storage is full.
    If auto-record is enabled, but auto-save is not, a new recording will not be started.  However, the camera will still auto-record after booting the camera.
    Warnings about filesize (over fat32 limit, or insufficient free space) can still be shown even if autosave is enabled (if autosave is enabled, the user is unlikely to be there to press Yes for the camera to continue saving)

4
Software Dev / Software V0.3 RC2 (Updated June 11, 2018)
« on: May 03, 2018, 08:27:43 PM »
Update (June 11 2018): RC2 posted

Here is the release candidate for V0.3, for those of you who want to try the latest and greatest. An updated manual is also attached to this post.

Keep in mind this software is still a release candidate. It has not gone through full validation yet, this software is generally stable but we don't recommend using this for any critical applications where it's not possible to recreate your shot. We recommend waiting for the final release for any applications that require guaranteed stability.


    ┌──────────────────────────────────┐
   ┌┘                                  └┐
   │     Chronos V0.3 RC2 Changelog     │
   └┐                                  ┌┘
    └──────────────────────────────────┘


Notable Changes (from V0.3 RC1):
- White balance can be selected from 5 common presets in addition to taking your own as you could previously.
- Colour calibration (via Set White Balance) now works as expected, and produces vastly more realistic colours.
- Fixed bug where corrupted frames would occur randomly (only on some cameras)
- Set White Balance now calculates against 80% brightness white instead of 100% brightness white.
- File size warning when saving are generally more reliable now. (eg., 4+GB file warning now FAT32-only, since only FAT32 has a 4GB file size limit.)
- Saving doesn't change the marked region of video. (Previously, it would advance video marks to the end of the recorded area.)
- Changes to video saving settings are now applied as they are made, not just when the popup is closed.
- Added a visual button to add more pre-record slider time in the trigger delay window.


Notable Changes (from V0.2.5):
- Colour reproduction is greatly improved, especially reds
- Keyboard behavior improved, text is now selected when you tap an edit box
- UI can be flipped, or set to display the main screen menu on the left side
- You can configure the "Unsaved video in RAM" popup when you hit the record button with an unsaved video in memory. It can be set to "Always", "If not reviewed" (default), or "Never". The previous behavior was always "If not reviewed".
- Fixed bug in 0.2.5 beta that resulted in a small portion of saves failing (about 2%)
- Fixed bug where segmented record mode would produce many invalid segments

More notable changes (from V0.2):
- Trigger I/O's Trigger delay input was moved to the Trigger Delay screen.
- Added Trigger Delay screen and Record Modes screen, accessible from Record Settings.
- Black cal duration reduced by 10s to 15s or so at max resolution. (We still hope to make this much, much faster in a future beta.)
- Use any SD card. Previously, a class 10 SD card was required. You can now use slower cards. Of course, using a slower SD card means that videos save slower too.
- You can now auto-record after saving and auto-save after recording. This can loop.

Minutiae:
- Mark In and Mark Out have been renamed to Mark Start and Mark End, probably just until the video seek bar is made horizontal.
- Playback screen has 'region to be saved' marked. Each region saved is marked in a different color.
- The Enter key has been changed to say Apply, since you have to press it to apply your changes.
- The sliders on main screen the play screen have been made larger for ease of grabbing.
- There is now a Settings tab in the Util pages.
- Trigger IO window: The ratio between post-trigger frames and record length in frames is kept constant between resolution and framerate changes.
- Play → Settings: bitsPerPixel, maxBitrate, saved file framerate, format, filename and save location are now saved as soon as they are changed instead of when the Close button is pressed.

RC1/RC2 known bugs:
-The first few frames in saved videos are from the end of the recording


Installation instructions:
  • Unzip the Zip file into the root directory of a FAT32 formatted USB stick
  • This should result in a camUpdate folder in the root directory of the stick
  • Boot up the camera and insert the USB stick
  • Backup your calibration data. Tap "Backup calibration data" and wait for this to complete (about 5 seconds). The cal data is now backed up on the USB drive as cal_[serial number].tar
  • To install the update, tap Apply Software Update
  • A message box should pop up indicating the software update was found. Tap Yes to install the update.
  • The screen will go black, you may see a screen saying "updating", and the update will be installed. This will take about 30 seconds, potentially longer depending on the speed of the USB drive. There's no feedback that anything is happening, just give it time. The camera will restart at the end of this process
  • Done!

As always, let us know of any bugs you find, we'll get them sorted out as quickly as possible. We anticipate the fully validated V0.3 release in about a month.

5
Chronos User Discussion / Chronos 1.4 RAW conversion tool - pyraw2dng
« on: February 20, 2018, 12:13:23 AM »
For those of you itching to shoot RAW on your Chronos, you can now use the raw saving feature in the latest beta software v0.2.5 along with this new conversion tool to make DNG sequences. This method of saving raw is only recommended for legacy workflows, the CinemaDNG saving option should be uses in most cases.

pyraw2dng converts the .raw files saved by Chronos to standard Adobe DNG files.

The pyraw2dng utility is open source, you can view the source code on Github:
https://github.com/krontech/chronos-utils/tree/master/python_raw2dng

Requirements

Python 2.7, available here: https://www.python.org/downloads/release/python-278/
This might work in Python 3 as well, but it has not been tested.

During the Windows Python 2.7 installation, ‘install’ "Add Python.exe to Path" as shown below:


Usage

Save your video using the RAW16bit format on the camera. Raw16RJ works, but the images are dark and need to be fixed in post.

Download the script (see link above)

Copy the script file, pyraw2dng.py and the raw 16 bit format video into the same directory.

Open a terminal (command prompt), then navigate to the folder with your videos and script

Execute the script as shown in the example below. You will need to update the -w and -l switches with your actual frame size.
pyraw2dng.py -w (width) -l (length) (filename)

Where:
(width) is the horizontal resolution of your recording
(length) is the vertical resolution of your recording
(filename) is the .raw file you want to convert

An example of a complete command is shown below:
pyraw2dng.py -w 1280 -l 1024 vid.raw

The raw video will be converted and saved as a DNG sequence in a folder of the same name as the .raw file.

Let us know how this works for you!

6
Software Dev / Software V0.3 Beta - Updated May 3 2018
« on: December 15, 2017, 12:52:17 AM »
UPDATE: V0.3 RC1 is out, go see the new topic.

We're just about finished testing the next software release, here is a beta you can try out. Try it out and let us know if you find any bugs.

You can downgrade to previous versions if there is a problem with this version. Just install the old version as normal.

V0.2.5 Beta Changelog (from V0.2:
  • Settings are now remembered across power cycles
  • Fixed issue where slow storage device would cause dropped frames. Video is now throttled as needed to prevent dropped frames on save.
  • Increased the speed of saving H264, now saves at up to 200fps depending on resolution
  • Added trigger delay setting screen (accessible from Record Settings), which allows setting of trigger delay with slider and delay in percentage, seconds
  • Added support for gated burst and segmented memory record modes
  • Fixed bug with RAM controller where horizontal colored speckling may occur when camera is cold
  • Added support for all memory permutations (8/16GB sticks) across both DDR3 slots. Max memory is now 32GB
  • Added save fps display to playback window
  • Added "Delete all user calibrations" button under Factory tab (accessible for users)
  • Camera now checks that storage device has sufficient free space before starting save
  • Added RAW saving (Raw binary, 12-bit packed, 16-bit unpacked LSB and MSB aligned. DNG is still in progress)
  • Added mode to automatically start recording on power-up and after save is complete (see Util menu)
  • Added mode to automatically save video after trigger is received. (see Util menu) Together with above, the camera can run completely standalone without an operator
  • Improved boot time
  • Kernel - turned off USB gadget debug
  • Filesystem - USB gadget networking update and boot splash screen added for serial numbers 00000-00049
  • Partial Ethernet - requires commandline access to enable (ifup eth0) (NOT SECURE! DO NOT PUT THE CAMERA ON A PUBLIC NETWORK - Behind router/firewall should be OK)
  • Fixed bug in V0.2.3 Beta where camera would claim there was no free space when there clearly is enough

Installation instructions:
  • Unzip the Zip file into the root directory of a FAT32 formatted USB stick
  • This should result in a camUpdate folder in the root directory of the stick
  • Boot up the camera and insert the USB stick
  • Backup your calibration data. Tap "Backup calibration data" and wait for this to complete (about 5 seconds). The cal data is now backed up on the USB drive as cal_[serial number].tar
  • To install the update, tap Apply Software Update
  • A message box should pop up indicating the software update was found. Tap Yes to install the update.
  • The screen will go black, you may see a screen saying "updating", and the update will be installed. This will take about 30 seconds, potentially longer depending on the speed of the USB drive. There's no feedback that anything is happening, just give it time. The camera will restart at the end of this process
  • Done!

7
Software Dev / Chronos Cam App open source build discussion
« on: November 20, 2017, 09:46:27 PM »
At long last, the Chronos Camera application source is now available at the following git repository:

chronos-cam-app

Currently we only support Ubuntu 16.04 LTS as a build environment. 17.04 is known to NOT work due to different compiler versions included. You're welcome to try other environments, please let us know what works and what doesn't.

Follow the instructions in the repository readme to set up your build environment.

We suggest not doing any significant changes or customization right now. We are in the process of breaking out the low level camera control into a daemon controlled over D-Bus. This will allow the cam app to talk to the camera seamlessly, whether local or operating remotely over a network connection. Ideally, the exact same application will be able to be compiled to run on the camera or on a PC.

Once you have the application compiling, you can connect to your camera over SSH. Plug the mini-USB port into your computer, and it will enumerate as a USB to Ethernet bridge (serial numbers 00050 and above, earlier cameras need an update, available here). You can then log into the camera using root/<no password>

I'm sure there will be many questions, please let us know any problems so we can provide better build instructions.

David

8
Chronos User Discussion / Shipping has begun on the main batch!
« on: August 31, 2017, 08:28:04 PM »
After many delays, setbacks and trials, we're excited to announce cameras are now finally shipping!

See the update on Kickstarter

Thanks everyone for your patience!

9
Chronos User Discussion / Full user manual is out
« on: August 14, 2017, 10:43:33 PM »
The full user manual for software V0.2 is now out, go find it at the resources page

As always, comments/suggestions are appreciated.

David

10
Software Dev / Software update V0.2
« on: July 12, 2017, 09:40:53 PM »
Here's the first software update!

Not a huge amount in this one, basically a few features requested by a few scientific users, and a bunch of low-hanging fruit . More major updates will probably have to wait until after the backlog of Kickstarter rewards and store preorders have shipped, since it's so busy leading up to production. Once we hire a software engineer, updates will be much more frequent and significant.

Features added and bugs fixed:
  • Added Triggered Exposure and Shutter Gating modes
  • Fixed bug where video can be saved to the mount point if no storage device is present
  • Fixed minimum exposure time (now 1uS instead of an impossible 10ns)
  • Added "About" tab to Util window, showing software version, serial number, and camera info
  • Added missing backer Jared Reabow in backers list
  • Added support for LUX1310 image sensor silicon revision 2
  • Fixed incorrect bitrate computation in save settings window
  • Disabled H264 profile and level controls (certain lower levels caused encoder to crash)
  • Fixed incorrect shutter slider and exposure text after changing resolution
  • Fixed incorrect updating of ROI indicator in Record Settings
  • Fixed allowable range of window offset to proper multiples (16, 2). Record settings would not be applied if offset was set other than proper multiple
  • Moved close button on keyboard to bottom right
  • Changed arrows on keyboard from text eg. "Up" to unicode arrow characters

Known bugs in added features:
  • Horizontal line issue is present in Triggered Exposure and Shutter Gating modes, to be fixed

Installation instructions:
  • Unzip the Zip file into the root directory of a FAT32 formatted USB stick
  • This should result in a camUpdate folder in the root directory of the stick
  • Boot up the camera and insert the USB stick
  • Backup your calibration data. Tap "Backup calibration data" and wait for this to complete (about 5 seconds). The cal data is now backed up on the USB drive as cal_[serial number].tar
  • To install the update, tap Apply Software Update
  • A message box should pop up indicating the software update was found. Tap Yes to install the update.
  • The screen will go blank for a few seconds, then the updated application will start.
  • Done! No need to restart the camera.

What if something goes wrong?
Don't worry, it's impossible to brick the camera. If the update fails for some reason and the camera won't boot, you can reflash the OS SD card yourself to recover the camera. If you need the image file to do this, let us know. It's just like flashing the OS card for a Raspberry Pi. You will need to restore the backed up calibration data after reflashing the card. If you don't have a backup, we have a copy of the original factory cal, available on request.

Next updates in the pipeline:
  • Proper trigger delay setting (Timeline/slider, pretrigger percentage, and setting by time rather than frames)
  • Remembering settings across reboots
  • Indication of dropped frames on save
  • Proper boot splash screen

11
Here's a draft of the Chronos 1.4 user manual. There are some sections that are not written yet, but it would be great to get some of you to review it. Any comments or suggestions are greatly appreciated.

If anyone wants to help writing any of the missing sections, that would also be great, and would get the full manual out faster.

12
Chronos User Discussion / List of good (and bad) SD cards
« on: July 01, 2017, 12:54:34 PM »
Let's make a list of known working and not working SD cards for Chronos, since some people seem to be having problems with video skipping on certain cards.

I have had very good luck with The following cards:

Lexar Professional 633x UHS-I

SanDisk Ultra 32GB microSDHC UHS-I (SDSQUNC-032G-GN6MA) (These were included with the promo cameras sent out before the Kickstarter)

Pages: [1]