For those of you itching to shoot RAW on your Chronos, you can now use the raw saving feature in the latest beta software
v0.2.5 along with this new conversion tool to make DNG sequences. This method of saving raw is only recommended for legacy workflows, the CinemaDNG saving option should be uses in most cases.
pyraw2dng converts the .raw files saved by Chronos to standard Adobe DNG files.
The pyraw2dng utility is open source, you can view the source code on Github:
https://github.com/krontech/chronos-utils/tree/master/python_raw2dngRequirementsPython 2.7, available here:
https://www.python.org/downloads/release/python-278/This might work in Python 3 as well, but it has not been tested.
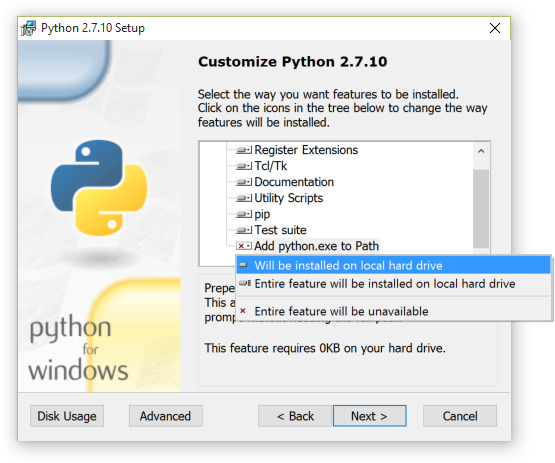
During the Windows Python 2.7 installation, ‘install’ "Add Python.exe to Path" as shown below:
 Usage
UsageSave your video using the RAW16bit format on the camera. Raw16RJ works, but the images are dark and need to be fixed in post.
Download the script (see link above)
Copy the script file, pyraw2dng.py and the raw 16 bit format video into the same directory.
Open a terminal (command prompt), then navigate to the folder with your videos and script
Execute the script as shown in the example below. You will need to update the -w and -l switches with your actual frame size.
pyraw2dng.py -w (width) -l (length) (filename)
Where:
(width) is the horizontal resolution of your recording
(length) is the vertical resolution of your recording
(filename) is the .raw file you want to convert
An example of a complete command is shown below:
pyraw2dng.py -w 1280 -l 1024 vid.raw
The raw video will be converted and saved as a DNG sequence in a folder of the same name as the .raw file.
Let us know how this works for you!